Showing posts with label Tamarisk Hat. Show all posts

Monday, September 13, 2010

The Naming of Hats is a Difficult Matter

One would like to have something catchy, or intriguing - perhaps with a hint of romance. Something exciting, something that resonates, something that sounds as though it had a good story behind it; and certainly something that hasn't already been used. Not so darned easy to come up with.

For that hat I just gave the rough and ready directions for, I've gone through and rejected any number of possibilities and finally decided on "Tamarisk". It doesn't really need a name right now, but I might actually sit down and write a proper pattern for it, and in that case it would. So I've tagged all the posts pertaining to it "Tamarisk Hat".

And On to the Finish

After completing the round with the crossed stitches, knit one more round with Red.

Drop the Red and pick up the Orange (O) yarn.

With O, purl 1 round, then knit 1 round.

Drop the O, and pick up the White (W) yarn.

At this point, you may break off O, leaving a tail long enough to weave in.

With W, knit 2 more rounds.

At this point, you may break off W, leaving a tail long enough to weave in.

With R: k1 *sl 2, k2; rep from *, end with sl 2, k 1
Work another round in the same way.

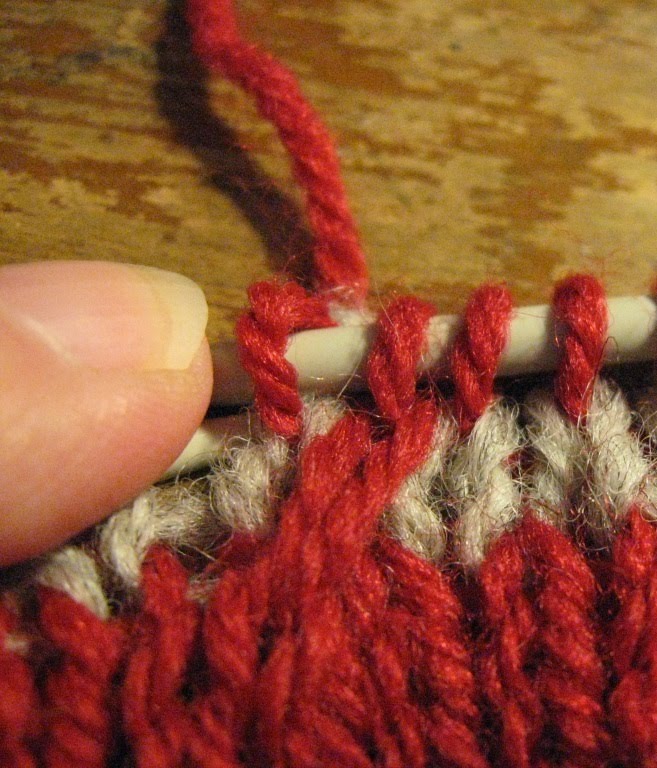
It will look like this, with the red stitches being the ones that were just knit, and the white stitches being the ones that were slipped.


Next round: *RC, LC; rep from *

The RC (Right Cross) will be worked exactly as in the previous post (although in this case it will be a White stitch crossing over a Red one.

The LC (Left Cross) is worked as follows.

Place the tip of the right needle behind the first stitch on the left needle and insert it purlwise into the second stitch.


Slip that second stitch off the left needle onto the right one. As you do this, the first stitch on the left needle will drop off to the front.


With the tip of the left needle, pick up the dropped stitch.


Then slip the first stitch from the right needle back onto the left needle. The two unworked stitches are now on the left needle with their position reversed.


Knit these two stitches - LC completed.

Complete the round by working a RC, then a LC, then a RC, then a LC and so on to the end.


From here on, it is smooth sailing.
Knit one more round in R.
Break off R and join B.
Next round: k1, *p2, k2; rep from *, end p2, k1
Next round: knit
Next round: purl
Next round: knit
Work 6 rounds of: k1, *p2, k2; rep from*, end p2, k1
Bind off in pattern. Weave in loose ends.

Carrying On

When I left off on the hat directions, I had just completed knitting one round in red, then, with white, working two rounds of *k3, sl 1; rep from *

This is what the stitches on the needle looked like.


I could have just knit the next round in red, for a windowpane effect, but I decided to get a bit fancy and throw in a little right cross (RC).

So this is how the directions for the next round would read: With R, * k2, RC;, rep from *

And this is how it is done:

With Red, knit two stitches. Then slip the next white stitch to the right needle and drop the red stitch off the left needle so that it falls toward the front.


Slip the white stitch back onto the left needle. With the tip of the right needle pick up the dropped (red) stitch and place it back onto the left needle.


The unworked white and red stitches are now both back on the left needle, but they have changed positions, with the red one crossing in front of the white one.


Now (with the R working yarn), knit both.


RC completed. Now k2, RC, k2 RC, etc. to the end of the round.

Friday, September 10, 2010

Let's See, Where Was I?

Before the commercial interruption, I was giving some directions for the multi-colored hat.

You might have noticed that at one point I said that I worked until I had 16 sts less than my desired final number of stitches. And, you might have wondered "Yes, but what the heck was that desired final number????"

Well on the first hat, based on a presumed gauge of 5 sts/inch, I was shooting for 96 sts to yield a finished circumference of 19.2 inches. BUT in real life the circumference came out at 20 inches, which means I was actually getting 4.8 sts/inch.

This was a little larger than I wanted.

So, for the second go around, I worked on the crown until I had a total of 88 stitches. And in the end it gave me a more satisfactory (to me) finished circumference of about 18 1/2 inches.

At any rate, once the crown was completed, I just worked even in my color pattern to the end - no more shaping. Here's how it went:

Join B (brown), but don't break off W (white), just carry it up inside the hat.

With B, knit 1 Rnd, purl 1 Rnd, knit 1 Rnd.

Drop B and pick up W.

With W, knit 2 Rnds.

Drop W and pick up B.

With B, knit 1 Rnd, purl 1 Rnd.

Now you can break off B, as it won't be used again for awhile.

Join R (red) and knit 1 Rnd.

Join O (orange), and with it *k1, sl 1; rep from * (Slip purwise wyib)

With O, knit 1 Rnd.

With R, purl 1 Rnd, knit 1 Rnd.

With W, *k3, sl 1; rep from*

Do the same thing again. That is, with W, *k3, sl 1: rep from *

At this point, you have some elongated (slipped) red stitches stretching over two rounds of white ones.

To be continued (after the weekend, because we're headed out of town)

Thursday, September 09, 2010

On a Hat Roll

I had one ball of Wool-Ease sitting around, so I made another hat.


I like it, though it is a bit too small for me.

***********
Due to popular demand (well one person suggested it), I decided to revisit the improvised hat and see if I could write directions for what I did. As I didn't take notes the first time around, I decided to re-knit it while the memory is still somewhat fresh.

As I mentioned before, I worked from the top down, which meant using a center start. There are more sophisticated ways of doing this than what I chose (Emily Ocker's Cast On), Judy's Magic Cast On); but this is what I did.

I used worsted weight yarn and a size needle that generally gives me 5 sts per inch in stockinette. I used bits of several colors which I will call W (white), B (brown), R (red) and O (orange). The white isn't exactly white in either hat, and in the first version the red is more of a deep rust, but these names will do.

Using the plain old long tail method, I cast on four stitches on one needle. Then I turned the work (as if I were working in rows). With one dpn I knit into the front and the back of the first stitch; with a second dpn I knit into the front and the back of the second stitch; with a third dpn I knit into the front and the back of the third stitch; with a fourth needle knit front and back of fourth st. Then I arranged the needles in a square so that I could proceed in rounds from there.


The last stitch is hiding under the needle on the left. I really have a total of eight stitches.

From here, I worked in rounds. The very first round I knit into the front and back of every stitch for a total of 16.

Then I started alternating 1 round even in knit with one increase round. The increase rounds went like this:

*k2, M1*; rep from *

*k3, M1*; rep from *

*k4, M1*; rep from*

and so on.

After a few rounds I hung a safety pin on the first stitch to mark the beginning. When I had enough stitches to fit, I changed to a 16" circular needle.

I kept going until I had 16 stitches less than my desired final number. Then I worked an increase round followed by two plain rounds, two times.

With that, the crown of the hat was done. This post is more than long enough. I'll continue it later.

Monday, September 06, 2010

Getting Goofy

I was at loose ends for a fairly simple project to work on. And I was feeling experimental. And I had some loose ends of worsted weight yarn, bits and pieces that didn't add up to enough to make anything large.

The situation obviously called for a "start at the top and make it up as you go along" hat.


This is the result of my playtime with color and texture. (As always, you can click on the picture to make it bigger). There are actually two different oranges and two different browns involved. There are some slipped stitches that have been crossed right and left. There is some purling. Kept my mind occupied without having to think more than a round or two ahead.